You know how some days you feel like you can't do anything right? Today was one of those days. I missed a call, let someone down, and then it was far too late to do anything but apologise.
The reason I missed the call? It wasn't raining today. I was hanging washing out, then working in the garden, and didn't hear the phone. All very understandable, but I still feel bad about it. Today I woke with pain in my neck and shoulder, having not slept well, and confused with the clocks change. Maybe confused is too strong, but it leaves me out of sorts for a day or 2. I'm out at work tomorrow and Tuesday, then busy Wednesday, so garden work had to be today or next Thursday. With the location, and time of year, I have to take advantage of the lack of rain whenever it happens. There is no, maybe later in the week, here!
The pain in my neck and shoulder is an old thing that happens now and then, a cramping/spasming muscle, which if left unchecked becomes really painful and affects my entire back. Out with the exercises I used to use to ease it and then make it all work some more by digging and building things in the garden. It aches now, but is moving a lot better. Exercise really does help sometimes.
The mission for the garden today was to tidy up the compost, dig some more of the pond, and stop the cat digging my bulbs! The cat issue was simple - put some sticks in and across the bed where the digging is happening. Deter them and they'll go and dig somewhere else. It worked for the garlic, that's why they started elsewhere: in the bulb bed. Hopefully that'll sort it out until the bulbs poke green through the soil.
Tidying up the compost was more of a problem. I've been using one of those black plastic "dalek" style bins. Fabulous invention, easy to place, move, fill, absolutely brilliant. Until you get rats move in and live in it. The neck is great for filling, and keeps it all nice and warm, but you can't really get a fork in there to stir the compost properly. So the rats love it. The rats have to go, so the dalek has to go. But I still have compost....
Three pallets and a few screws later, and my compost is mostly contained, and I can get in there and turn it regularly to deter the rats.It's uneven because I didn't bother trimming the pallets to size. I don't care really, it's just to contain a sprawling pile of rotting vegetation and to provide a space for me to throw more. It works, and there's plenty of space for more to be added.
I dug the pond hole a bit deeper before deciding that my shoulder wasn't going to like that for too long. So it's still not finished but it's a bit more done than it was. I also added 3 more pallets to the growing hen run. Again, it's not finished but it's a bit more done than it was.
Through all of that I realised I'd forgotten something. Dirt feels good, and helps me to feel better. I'd lost the time and head space to just work on my own, in my garden, breathing in that special earth smell, feeling the mud dry on my hands, the wind through my hair, hearing the birds and insects around the place. It's healing.
I'm an Englishwoman, living in the South Wales Valleys. I blog about life, stuff that catches my eye, and the occasional soap boxy rant.
Showing posts with label chicken run. Show all posts
Sunday, 25 October 2015
Friday, 7 August 2015
Dammit, I had to buy stuff...
Work on the hen house is proceeding well. Having gathered most of the materials from various places, and all for free, it came as a bit of a shock to actually have to pay for something!
But the scavenged guttering, and drainpipe, needed fixing in place and no fixings could be found so I decided that I would go and buy the few bits I needed.
3 gutter clips, 1 pipe clip, 3 gutter end stops, and an end piece to join the gutter to the pipe. About £13. But the gutter needs to be trimmed... Add a hacksaw for £4. Tools are always a longer term investment, so I'm not counting that cost against the hen house build costs. I'd already included the gutter fixings in my original house cost tally of roughly £30.
That's the hen house, all painted and ready for the guttering. The pallet at the side is the start of the run, and will be turned the other way up, trimmed and attached to the house before being covered with wire mesh. More on the mesh in a moment.
Guttering in place, and drinking trough working! One of the few times I actually wish it would rain so the system can be tested properly. I've poured a watering can full of water over the roof and it works! The water runs into the gutter, down the pipe, and catches in the trough at the bottom. There was a slight leak/overspill at one end but a piece of pond liner stopped that, and protects the hinges on the nest box too.
Today I've used a length of roofing baton to make a perch inside the house, and some offcuts to make a ramp from a piece of scaffolding board for the front.
So, the hen house is finished and ready for occupation, except there's no run....
Wilkinson's have had a sale.
Wire mesh: 25mm netting; 600mm high, 10m long. £1.25 per roll. 5 rolls (all they had on the shelf) Thank you very much.
Now to make the frame for the run, add the wire netting, maybe look at some of the stronger stuff for the bottom layer, and it'll be good to go!
So far, with the netting, it's looking like £35 for materials. But I'm going to need some hinges and a bolt/catch for a door into the run. It'll be more like £40 all in, I think.
But the scavenged guttering, and drainpipe, needed fixing in place and no fixings could be found so I decided that I would go and buy the few bits I needed.
3 gutter clips, 1 pipe clip, 3 gutter end stops, and an end piece to join the gutter to the pipe. About £13. But the gutter needs to be trimmed... Add a hacksaw for £4. Tools are always a longer term investment, so I'm not counting that cost against the hen house build costs. I'd already included the gutter fixings in my original house cost tally of roughly £30.
That's the hen house, all painted and ready for the guttering. The pallet at the side is the start of the run, and will be turned the other way up, trimmed and attached to the house before being covered with wire mesh. More on the mesh in a moment.
Guttering in place, and drinking trough working! One of the few times I actually wish it would rain so the system can be tested properly. I've poured a watering can full of water over the roof and it works! The water runs into the gutter, down the pipe, and catches in the trough at the bottom. There was a slight leak/overspill at one end but a piece of pond liner stopped that, and protects the hinges on the nest box too.
Today I've used a length of roofing baton to make a perch inside the house, and some offcuts to make a ramp from a piece of scaffolding board for the front.
So, the hen house is finished and ready for occupation, except there's no run....
Wilkinson's have had a sale.
Wire mesh: 25mm netting; 600mm high, 10m long. £1.25 per roll. 5 rolls (all they had on the shelf) Thank you very much.
Now to make the frame for the run, add the wire netting, maybe look at some of the stronger stuff for the bottom layer, and it'll be good to go!
So far, with the netting, it's looking like £35 for materials. But I'm going to need some hinges and a bolt/catch for a door into the run. It'll be more like £40 all in, I think.
Tuesday, 21 July 2015
Hen house build complete - ish.
OK, so the guttering and drinking water system isn't done yet, and it needs wood preserving stain painting on, which needs a dry couple of days... But it's pretty much done!
The rear access door is fitted, with a support for when it's open so it doesn't over strain the hinges.
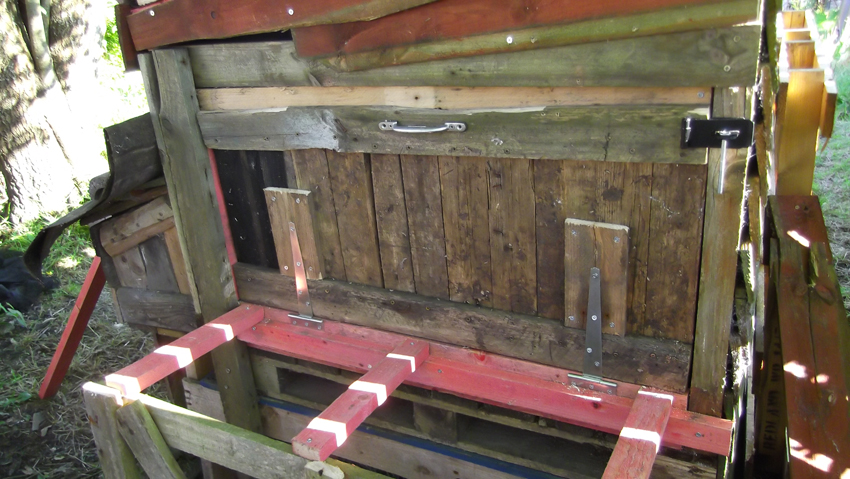
Access door closed - it'll need a catch of some sort on the left side for added security, and the hasp on the right will need a peg or padlock, depending on how secure I decide I want it to be. The door opens from the top down and it's really quite heavy so I've made a frame to support it when open. It seems to work ok.
There you go, access door open, resting on the support. An added bonus is that I'll have somewhere to rest bedding or a bucket for cleaning out. The hens will have plenty of room in there, and I'll be making a perch to go in there too - a free standing one that I can take out to scrub now and then. Having had hens before, the perches can get disgusting!
After the rain we've had I'm waiting for the hen house to dry out properly, and a couple of dry days after that to get out there and paint it all with the wood preserving stain. At some point over the next couple of weeks I'll pick up the fixings for the guttering and sort that out too.
Then it's on with the run!
The hens can't free range in the garden here, it's just not safe, or fair to my neighbours who have, between them, several dogs, gardens full of veg, fruit, and flowers, and one who is scared of birds. So, my hens will stay securely penned. They'll have plenty of space, fresh air, andsun weather, and I'll make sure they get all the garden weeds and pests they can handle, but they'll stay in the pen.
Starting to plan the run.
The hen house is 4 feet wide, without the nest box, and that's where the run will start, widening from the house out in a sort of wedge shape. The straightest side will run parallel to the fence on the left and will be 4 pallets long and by the time it reaches where the garden drops away (the end of the hen area) it'll be 3 pallets wide (tripling in width from the hen house end)
It's going to be a massive run for them, when we get them. I'm still deciding whether I want 3 or 4? And how tall do I want the run?
The rear access door is fitted, with a support for when it's open so it doesn't over strain the hinges.
Access door closed - it'll need a catch of some sort on the left side for added security, and the hasp on the right will need a peg or padlock, depending on how secure I decide I want it to be. The door opens from the top down and it's really quite heavy so I've made a frame to support it when open. It seems to work ok.
There you go, access door open, resting on the support. An added bonus is that I'll have somewhere to rest bedding or a bucket for cleaning out. The hens will have plenty of room in there, and I'll be making a perch to go in there too - a free standing one that I can take out to scrub now and then. Having had hens before, the perches can get disgusting!
After the rain we've had I'm waiting for the hen house to dry out properly, and a couple of dry days after that to get out there and paint it all with the wood preserving stain. At some point over the next couple of weeks I'll pick up the fixings for the guttering and sort that out too.
Then it's on with the run!
The hens can't free range in the garden here, it's just not safe, or fair to my neighbours who have, between them, several dogs, gardens full of veg, fruit, and flowers, and one who is scared of birds. So, my hens will stay securely penned. They'll have plenty of space, fresh air, and
Starting to plan the run.
The hen house is 4 feet wide, without the nest box, and that's where the run will start, widening from the house out in a sort of wedge shape. The straightest side will run parallel to the fence on the left and will be 4 pallets long and by the time it reaches where the garden drops away (the end of the hen area) it'll be 3 pallets wide (tripling in width from the hen house end)
It's going to be a massive run for them, when we get them. I'm still deciding whether I want 3 or 4? And how tall do I want the run?
Labels:
chicken run,
chickens,
hen house,
make your own,
pallets,
recycle,
reuse
Subscribe to:
Posts (Atom)