Work on the hen house is proceeding well. Having gathered most of the materials from various places, and all for free, it came as a bit of a shock to actually have to pay for something!
But the scavenged guttering, and drainpipe, needed fixing in place and no fixings could be found so I decided that I would go and buy the few bits I needed.
3 gutter clips, 1 pipe clip, 3 gutter end stops, and an end piece to join the gutter to the pipe. About £13. But the gutter needs to be trimmed... Add a hacksaw for £4. Tools are always a longer term investment, so I'm not counting that cost against the hen house build costs. I'd already included the gutter fixings in my original house cost tally of roughly £30.
That's the hen house, all painted and ready for the guttering. The pallet at the side is the start of the run, and will be turned the other way up, trimmed and attached to the house before being covered with wire mesh. More on the mesh in a moment.
Guttering in place, and drinking trough working! One of the few times I actually wish it would rain so the system can be tested properly. I've poured a watering can full of water over the roof and it works! The water runs into the gutter, down the pipe, and catches in the trough at the bottom. There was a slight leak/overspill at one end but a piece of pond liner stopped that, and protects the hinges on the nest box too.
Today I've used a length of roofing baton to make a perch inside the house, and some offcuts to make a ramp from a piece of scaffolding board for the front.
So, the hen house is finished and ready for occupation, except there's no run....
Wilkinson's have had a sale.
Wire mesh: 25mm netting; 600mm high, 10m long. £1.25 per roll. 5 rolls (all they had on the shelf) Thank you very much.
Now to make the frame for the run, add the wire netting, maybe look at some of the stronger stuff for the bottom layer, and it'll be good to go!
So far, with the netting, it's looking like £35 for materials. But I'm going to need some hinges and a bolt/catch for a door into the run. It'll be more like £40 all in, I think.
I'm an Englishwoman, living in the South Wales Valleys. I blog about life, stuff that catches my eye, and the occasional soap boxy rant.
Showing posts with label make your own. Show all posts
Friday, 7 August 2015
Tuesday, 21 July 2015
Hen house build complete - ish.
OK, so the guttering and drinking water system isn't done yet, and it needs wood preserving stain painting on, which needs a dry couple of days... But it's pretty much done!
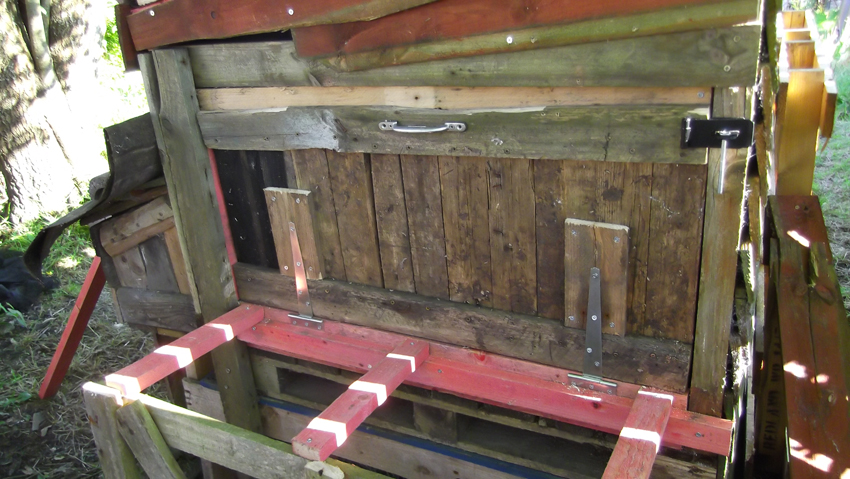
The rear access door is fitted, with a support for when it's open so it doesn't over strain the hinges.
Access door closed - it'll need a catch of some sort on the left side for added security, and the hasp on the right will need a peg or padlock, depending on how secure I decide I want it to be. The door opens from the top down and it's really quite heavy so I've made a frame to support it when open. It seems to work ok.
There you go, access door open, resting on the support. An added bonus is that I'll have somewhere to rest bedding or a bucket for cleaning out. The hens will have plenty of room in there, and I'll be making a perch to go in there too - a free standing one that I can take out to scrub now and then. Having had hens before, the perches can get disgusting!
After the rain we've had I'm waiting for the hen house to dry out properly, and a couple of dry days after that to get out there and paint it all with the wood preserving stain. At some point over the next couple of weeks I'll pick up the fixings for the guttering and sort that out too.
Then it's on with the run!
The hens can't free range in the garden here, it's just not safe, or fair to my neighbours who have, between them, several dogs, gardens full of veg, fruit, and flowers, and one who is scared of birds. So, my hens will stay securely penned. They'll have plenty of space, fresh air, andsun weather, and I'll make sure they get all the garden weeds and pests they can handle, but they'll stay in the pen.
Starting to plan the run.
The hen house is 4 feet wide, without the nest box, and that's where the run will start, widening from the house out in a sort of wedge shape. The straightest side will run parallel to the fence on the left and will be 4 pallets long and by the time it reaches where the garden drops away (the end of the hen area) it'll be 3 pallets wide (tripling in width from the hen house end)
It's going to be a massive run for them, when we get them. I'm still deciding whether I want 3 or 4? And how tall do I want the run?
The rear access door is fitted, with a support for when it's open so it doesn't over strain the hinges.
Access door closed - it'll need a catch of some sort on the left side for added security, and the hasp on the right will need a peg or padlock, depending on how secure I decide I want it to be. The door opens from the top down and it's really quite heavy so I've made a frame to support it when open. It seems to work ok.
There you go, access door open, resting on the support. An added bonus is that I'll have somewhere to rest bedding or a bucket for cleaning out. The hens will have plenty of room in there, and I'll be making a perch to go in there too - a free standing one that I can take out to scrub now and then. Having had hens before, the perches can get disgusting!
After the rain we've had I'm waiting for the hen house to dry out properly, and a couple of dry days after that to get out there and paint it all with the wood preserving stain. At some point over the next couple of weeks I'll pick up the fixings for the guttering and sort that out too.
Then it's on with the run!
The hens can't free range in the garden here, it's just not safe, or fair to my neighbours who have, between them, several dogs, gardens full of veg, fruit, and flowers, and one who is scared of birds. So, my hens will stay securely penned. They'll have plenty of space, fresh air, and
Starting to plan the run.
The hen house is 4 feet wide, without the nest box, and that's where the run will start, widening from the house out in a sort of wedge shape. The straightest side will run parallel to the fence on the left and will be 4 pallets long and by the time it reaches where the garden drops away (the end of the hen area) it'll be 3 pallets wide (tripling in width from the hen house end)
It's going to be a massive run for them, when we get them. I'm still deciding whether I want 3 or 4? And how tall do I want the run?
Labels:
chicken run,
chickens,
hen house,
make your own,
pallets,
recycle,
reuse
Saturday, 18 July 2015
A hen house for £30.
The scaffolding is gone, the drainpipe has been reattached, the TV signal is back (blocked by the scaffolding), and the roofers asked if I wanted any more pallets, and could I use the broken ridge tiles?
Oh Yeah!
The broken ridge tiles are a curved, half cylinder piece - not intact but still plenty of room and curve on the large bits I kept. I'm keeping them for a pond project, they'll be fab for wildlife hidey holes near the edge of the pond. Might put some in the hen run for fun too.
Why are you laughing? Hens like fun too! I've had hens before and they do enjoy different height things to scratch round and peck at, and it helps them establish a strong flock pecking order. Different levels of things in the run also helps them keep their feet out of the mud when it rains.
Today is the first day of the summer holidays, the kids are at home - or out with friends, or being anti-social in their bedrooms.... and the sun is shining. Time to get out the power tools and get cracking with the hen house. I'd already placed the roof tiles and batons but not fixed them into place.
Three supporting batons running from the tall side by the fence to the lower side over the nest box, with 2 pieces of overlapping reclaimed roof membrane for extra waterproofing and insulation over those, and then 4 batons running across the supports to hold the tiles in place.
A recent trip out produced a length of guttering and a drainpipe that I can cut to size and fit to stop the tiles dripping onto the nest box. The drainpipe will take rainwater from the roof down into a container for the hens to drink.
The roof is really working, and I've been irrationally pleased with it. Having put the tiles in place to protect the membrane and batons, the inside of the house is staying nice and dry, apart from the back, which is open. But, it works, it really works, and I made it! I'm loving the lack of expenditure too.
Costs so far:
Screws and other fittings = about a tenner I think, might be £15. I've sourced everything as cheaply as possible and haven't kept definite track of the cost of each piece so far.
The wood preserving stain was £5.99 and was bought for the pallet planter project, but with other jobs in mind.
So, about £20ish so far, and I don't think I'll need anything other than the gutter fittings to finish the hen house. Those should be about another £10 if I get them new.
£30 for a spacious, solid, posh-looking, hen house? That'll do nicely.
Oh Yeah!
The broken ridge tiles are a curved, half cylinder piece - not intact but still plenty of room and curve on the large bits I kept. I'm keeping them for a pond project, they'll be fab for wildlife hidey holes near the edge of the pond. Might put some in the hen run for fun too.
Why are you laughing? Hens like fun too! I've had hens before and they do enjoy different height things to scratch round and peck at, and it helps them establish a strong flock pecking order. Different levels of things in the run also helps them keep their feet out of the mud when it rains.
Today is the first day of the summer holidays, the kids are at home - or out with friends, or being anti-social in their bedrooms.... and the sun is shining. Time to get out the power tools and get cracking with the hen house. I'd already placed the roof tiles and batons but not fixed them into place.
Three supporting batons running from the tall side by the fence to the lower side over the nest box, with 2 pieces of overlapping reclaimed roof membrane for extra waterproofing and insulation over those, and then 4 batons running across the supports to hold the tiles in place.
A recent trip out produced a length of guttering and a drainpipe that I can cut to size and fit to stop the tiles dripping onto the nest box. The drainpipe will take rainwater from the roof down into a container for the hens to drink.
It's not the size I was looking at getting but it was free! I'll need to find, or buy, the clips to fix the guttering and pipe in place, and a connector bit to fit the pipe to the gutter. But that'll happen at some point before the run is attached, after the wood preserving stain goes on. In the meantime I'm working on the roof, and then the back of the house - which is still open and needs a door - and the ramp.
The featherboard cladding is going on round the edges of the roof, with mesh cut from a reclaimed trampoline net being used to fill the gaps for ventilation - hens need plenty of ventilation.The roof is really working, and I've been irrationally pleased with it. Having put the tiles in place to protect the membrane and batons, the inside of the house is staying nice and dry, apart from the back, which is open. But, it works, it really works, and I made it! I'm loving the lack of expenditure too.
Costs so far:
Screws and other fittings = about a tenner I think, might be £15. I've sourced everything as cheaply as possible and haven't kept definite track of the cost of each piece so far.
The wood preserving stain was £5.99 and was bought for the pallet planter project, but with other jobs in mind.
So, about £20ish so far, and I don't think I'll need anything other than the gutter fittings to finish the hen house. Those should be about another £10 if I get them new.
£30 for a spacious, solid, posh-looking, hen house? That'll do nicely.
Labels:
chickens,
garden,
hen house,
make your own,
recycle,
repurpose,
reuse,
scavenging
Sunday, 12 July 2015
Fifteen pallets and some chipped roof tiles.
The roof is done, the scaffolding is still here, and the less said about corporate incompetence and lack of communication the better. The gas is back on. Don't ask.
So, on a positive note, the roof is finished and I hope the scaffolding will be gone next week. Stacked up in the back garden I have fifteen pallets, and a pile of slightly chipped roof tiles.
I'm thinking about the chicken coop. Did I ever tell you about that? No?
A whole pallet for the house floor, supported on sections of pallets cut to size, with reclaimed fence posts to add corners and structure for the upper section of the house. The idea is that the hens will have some shelter under the house for their food and water, with paving slabs for a drier area, to shelter from the weather. We have rather a lot of weather in Wales...
The sides are reclaimed board from a broken fence panel given to me by my next door neighbours at the back. And this is where it stalled last year when the weather got the better of me, I ran out of supplies, and one of the cats became rather expensively unwell with long term implications to boot!
This is where it is today. It's all got overgrown, but the supplies are there to get on with the next stage. I'll be putting the roof on next, seeing if I can fix the hatch panel for the back - for cleaning and access for checking the hens. It also needs wood stain and preservative painting on - I have plenty left from the pallet planter project. Then I can think about the run.
It's all reclaimed and reused wood - the base is a whole pallet, the sides are fence posts and pieces of fence panel, and the roof will be roof tiles. The run, which will be attached - I can't have free ranging hens here - will be more pallets. In the end I will have to have bought the hardware - screws, nails, hinges, handles etc - and some wire mesh to cover the run sides and top.
I'm thinking about how I might add a strip of guttering to the hen house roof, and if that could run into a drinking trough for them? Fresh rainwater every time it rains, could be fab! But what to do if it overflows? Obviously, if it doesn't rain I can just take a watering can and fill it up... But if it goes all monsoon on me, as it does through the year at irregular intervals, will it flood the chicken run? Could I just angle the drinking part so it overflows outside the run? This will require more thought and planning!
I think I should be able to get a length of guttering and the fittings to do the hen house, and the shed - to go into a water butt - for not a lot of expense.
I think it'll be far too late to add hens this year by the time I'm done, but next Spring!
So, on a positive note, the roof is finished and I hope the scaffolding will be gone next week. Stacked up in the back garden I have fifteen pallets, and a pile of slightly chipped roof tiles.
I'm thinking about the chicken coop. Did I ever tell you about that? No?
The sides are reclaimed board from a broken fence panel given to me by my next door neighbours at the back. And this is where it stalled last year when the weather got the better of me, I ran out of supplies, and one of the cats became rather expensively unwell with long term implications to boot!
This is where it is today. It's all got overgrown, but the supplies are there to get on with the next stage. I'll be putting the roof on next, seeing if I can fix the hatch panel for the back - for cleaning and access for checking the hens. It also needs wood stain and preservative painting on - I have plenty left from the pallet planter project. Then I can think about the run.
It's all reclaimed and reused wood - the base is a whole pallet, the sides are fence posts and pieces of fence panel, and the roof will be roof tiles. The run, which will be attached - I can't have free ranging hens here - will be more pallets. In the end I will have to have bought the hardware - screws, nails, hinges, handles etc - and some wire mesh to cover the run sides and top.
I'm thinking about how I might add a strip of guttering to the hen house roof, and if that could run into a drinking trough for them? Fresh rainwater every time it rains, could be fab! But what to do if it overflows? Obviously, if it doesn't rain I can just take a watering can and fill it up... But if it goes all monsoon on me, as it does through the year at irregular intervals, will it flood the chicken run? Could I just angle the drinking part so it overflows outside the run? This will require more thought and planning!
I think I should be able to get a length of guttering and the fittings to do the hen house, and the shed - to go into a water butt - for not a lot of expense.
I think it'll be far too late to add hens this year by the time I'm done, but next Spring!
Sunday, 14 June 2015
Making a High rise bug hotel
I love my garden. I've always made sure I have flowers, especially those that attract bees and other pollinators and beneficial insects.My foxgloves are just bursting into flower, and they're enormously tall this year. There are some big, ornamental, daisies by the fedge. There are lawn daisies, dandelions, and buttercups, in my lawn. My comfrey has been flowering. The fruit bushes have finished flowering, and so have the apple trees.
I have plants growing that will flower later, or next year. There are 2 clematis - one with small, pale blue flowers, and another with larger, darker flowers. The pale one will flower soon, the darker one only just went in the ground so who knows this year! There's a recently acquired honeysuckle, which may or may not flower this summer. The geraniums, one pink, one blue, are establishing themselves but won't have many flowers. The herb garden only just went in, so not much there either.
Slowly, it is developing into a vibrant, colourful, garden.
I saw a project for building a HUGE bug hotel from a pile of pallets. The one I saw had hedgehog homes at the base, stacks of rotting wood, layers of dead leaves, piles of bamboo canes, and used several pallets.
I don't want anything that big.
I started by prowling my pile of mostly dismembered pallet bits. If you're working with pallets, it's always worth keeping the unused bits for a while. You never know when inspiration may strike!
Make a variety of fillings from dead stuff you have round the garden - dead, dry, sticks, dead leaves, grass, anything like that. You'll also need some holes - so bits of bamboo cane, or wood with holes drilled in are all perfect.The more variety of fillings - potential homes -you can put in, the more different insects you'll get.
I stuffed mine with some straw, sticks collected from the garden, a block from my pallet bits pile - with assorted holes drilled into it, cut bamboo canes, and some dead leaves and grass - again gathered from the garden. The canes were old, broken, ones from the shed - sawn to fit with the open ends facing front so solitary bees and other insects may find them appealing. Don't try to clip canes with secaturs or they collapse and split! You want the little tubes for insect homes. The block of wood with the holes was fun! I took my cordless drill, a pack of wood drill bits, and just made holes in different sizes. Some of the sticks needed to be snapped or sawn to fit nicely.
Have fun!
I have plants growing that will flower later, or next year. There are 2 clematis - one with small, pale blue flowers, and another with larger, darker flowers. The pale one will flower soon, the darker one only just went in the ground so who knows this year! There's a recently acquired honeysuckle, which may or may not flower this summer. The geraniums, one pink, one blue, are establishing themselves but won't have many flowers. The herb garden only just went in, so not much there either.
Slowly, it is developing into a vibrant, colourful, garden.
I saw a project for building a HUGE bug hotel from a pile of pallets. The one I saw had hedgehog homes at the base, stacks of rotting wood, layers of dead leaves, piles of bamboo canes, and used several pallets.
I don't want anything that big.
I started by prowling my pile of mostly dismembered pallet bits. If you're working with pallets, it's always worth keeping the unused bits for a while. You never know when inspiration may strike!
Stage one: Find, or make, a frame for the bits to go in.
I used this part of a pallet, but you can use, or build, whatever size or shape you want - just remember you will need to fill it with stuff for the bugs to live in. You'll see what I mean in a moment. I screwed a plank taken from another pallet to one side - providing a back to contain the filling, and as the plank was longer than the pallet section it would also provide a means of attaching the finished hotel to the fence.Stage 2: Stuff it with stuff.
You can see the top of the back plank poking out at the top there, and there's a bit at the bottom too. You can place your backing however you want depending on how, and where, you intend to place the hotel. I wanted to fix mine in place so it can't fall over, so I left a bit for that.Make a variety of fillings from dead stuff you have round the garden - dead, dry, sticks, dead leaves, grass, anything like that. You'll also need some holes - so bits of bamboo cane, or wood with holes drilled in are all perfect.The more variety of fillings - potential homes -you can put in, the more different insects you'll get.
I stuffed mine with some straw, sticks collected from the garden, a block from my pallet bits pile - with assorted holes drilled into it, cut bamboo canes, and some dead leaves and grass - again gathered from the garden. The canes were old, broken, ones from the shed - sawn to fit with the open ends facing front so solitary bees and other insects may find them appealing. Don't try to clip canes with secaturs or they collapse and split! You want the little tubes for insect homes. The block of wood with the holes was fun! I took my cordless drill, a pack of wood drill bits, and just made holes in different sizes. Some of the sticks needed to be snapped or sawn to fit nicely.
Stage 3: Placing.
Place your bug hotel close to where you want your pollinators - if that's why you're making one. That's the exact reason for mine so the hotel is fastened to the fence post at the end of the block wall in my garden - next to my apple trees and near my veg beds. You can put yours wherever you like, but bear in mind that like all wildlife, insects are more likely to move in if they can be undisturbed most of the time. Don't go poking it until your residents have had time to settle in, and even then, don't disturb them if you want them to stay.Have fun!
Thursday, 11 June 2015
From Pallets to Planting
Remember the small allotment? When something is 10 mins drive away, you think, it's close enough, I can do that..... Then there are a million and one other things you could be doing instead, and your own back garden is horribly neglected, and so is the (lovely idea) small allotment.
We gave it up when they asked for rent again this year.
I went up and pulled most of the surviving onions and leeks, dug up some of the strawberries, salvaged the compost bin, retrieved the canes, and decided the rest was a dead loss and wasn't worth the effort.
Then Operation Garden could begin!
The trouble with my garden is that it is packed full of rubbish. Electrical wire, bits of cooker, chunks of lino, fragments of polystyrene, shattered corrugated plastic, shards of glass, tin cans..... I looked at the fork, the spade, this was why I agreed to the allotment.
Raised beds, or containers, of some sort seemed the way to go. I ordered 4 of these, which are absolutely fab - but look a bit like I've had a load of sand delivered. They're not the prettiest things, but will be functional and will look better once I have plants growing in them.
Then I looked at the broken pallets I have stacked by the shed.
That's a heavy blue one, given to me already broken. All of one side, and most of the other, is missing, leaving the frame intact.
I stapled weed suppressing fabric to the side with a bit more support, leaving the more open side as the top. If I box in the sides, then I'll have a nice large planter, a bit like this one, but bigger...
That one was half a pallet with the top planks taken off and put on the sides and ends to box it in. It's filled with a freely draining, not particularly nutritious, compost, and planted with herbs. It looks, and smells, lovely as they perk up after being planted.
I boxed in the sides of the blue pallet to make my planter. Then I wondered if the other pallet in similar condition was the same size!
A perfect match, ish, mostly... Close enough! The 2 pallets stacked like that gives me 2 planting spaces about a foot deep with a support across the middle where I can lean while working on planting, weeding, etc. So I boxed in the rest of the sides.
I pulled planks off the top pallet, and other pallets I had in the garden, and used those - cut to length by eye and screwed into place using 2 inch screws - again, placed by eye and not evenly as the screws needed to bite into the best bit of wood available - not always in the same place.
Boxing in finished. It's not the neatest, but I'm proud of it. The planter is solid and sturdy.
So far - pallets scrounged for free, a pack of weed fabric and 2 packs of 2 inch screws from the Poundshop. Total cost so far: £3.00.
It looked a bit rough, and someone on an allotment group on Facebook suggested wood stain.
Now doesn't that look better?
And there's the bag-veg-beds behind it. See what I mean about looking like the aftermath of a sand delivery?
Woodstain from Home Bargains, dark oak, water based: £5.99 for a HUGE tub, that I've barely touched.
Total cost: £9, and some time and energy, and plenty of stain left to do more stuff.
Tools used:
Hammer and big chisel thing - for dismembering the pallets, removing nails.
Saw
Cordless drill - with drill bit to suit the screws, and screwdriver bit.
Paintbrush - whatever size you like, I used a 2in brush as it was the first one I laid hands on!
Now I just hope my compost bins have been busy and I have enough compost....
Additional cost: About £6 in dehydrated compost from B&M to use as filler....
We gave it up when they asked for rent again this year.
I went up and pulled most of the surviving onions and leeks, dug up some of the strawberries, salvaged the compost bin, retrieved the canes, and decided the rest was a dead loss and wasn't worth the effort.
Then Operation Garden could begin!
The trouble with my garden is that it is packed full of rubbish. Electrical wire, bits of cooker, chunks of lino, fragments of polystyrene, shattered corrugated plastic, shards of glass, tin cans..... I looked at the fork, the spade, this was why I agreed to the allotment.
Raised beds, or containers, of some sort seemed the way to go. I ordered 4 of these, which are absolutely fab - but look a bit like I've had a load of sand delivered. They're not the prettiest things, but will be functional and will look better once I have plants growing in them.
Then I looked at the broken pallets I have stacked by the shed.
That's a heavy blue one, given to me already broken. All of one side, and most of the other, is missing, leaving the frame intact.
I stapled weed suppressing fabric to the side with a bit more support, leaving the more open side as the top. If I box in the sides, then I'll have a nice large planter, a bit like this one, but bigger...
That one was half a pallet with the top planks taken off and put on the sides and ends to box it in. It's filled with a freely draining, not particularly nutritious, compost, and planted with herbs. It looks, and smells, lovely as they perk up after being planted.
I boxed in the sides of the blue pallet to make my planter. Then I wondered if the other pallet in similar condition was the same size!
A perfect match, ish, mostly... Close enough! The 2 pallets stacked like that gives me 2 planting spaces about a foot deep with a support across the middle where I can lean while working on planting, weeding, etc. So I boxed in the rest of the sides.
I pulled planks off the top pallet, and other pallets I had in the garden, and used those - cut to length by eye and screwed into place using 2 inch screws - again, placed by eye and not evenly as the screws needed to bite into the best bit of wood available - not always in the same place.
Boxing in finished. It's not the neatest, but I'm proud of it. The planter is solid and sturdy.
So far - pallets scrounged for free, a pack of weed fabric and 2 packs of 2 inch screws from the Poundshop. Total cost so far: £3.00.
It looked a bit rough, and someone on an allotment group on Facebook suggested wood stain.
Now doesn't that look better?
And there's the bag-veg-beds behind it. See what I mean about looking like the aftermath of a sand delivery?
Woodstain from Home Bargains, dark oak, water based: £5.99 for a HUGE tub, that I've barely touched.
Total cost: £9, and some time and energy, and plenty of stain left to do more stuff.
Tools used:
Hammer and big chisel thing - for dismembering the pallets, removing nails.
Saw
Cordless drill - with drill bit to suit the screws, and screwdriver bit.
Paintbrush - whatever size you like, I used a 2in brush as it was the first one I laid hands on!
Now I just hope my compost bins have been busy and I have enough compost....
Additional cost: About £6 in dehydrated compost from B&M to use as filler....
Tuesday, 11 March 2014
Blanket
I've started knitting a blanket, this one. Well, mostly that one, but maybe with some of these, and some of these thrown in if I get bored. I have no idea how big the thing will be once I've done, or how long it'll take, but it's a fun thing to try.
The Log Cabin square is based on this pattern, knitted according to the instructions in the first link. It's actually a lot easier than it looks.
I've started by working the squares in 3 colours each - not the same colours for every square because I'm using up a bag of left overs. There are blues, greens, cream and yellow with a few bits of rusty red-ish and beige. I'm no visual artist but I think it'll look good.
The first square is finished, and the second started. With each square coming out at around a foot along each side, that's 30cm, it won't take that many squares for a blanket. Four squares across and it'll be almost the width of a double bed! I'm going to carry on until I run out of yarn and then see how many squares I have. I may have to get some extra yarn to finish it off, but we'll see.
It's going to take a while to do, but it'll be worth the time and effort
Please excuse the cat, she was trying to help, and was insistent that she be in the picture.
The Log Cabin square is based on this pattern, knitted according to the instructions in the first link. It's actually a lot easier than it looks.
I've started by working the squares in 3 colours each - not the same colours for every square because I'm using up a bag of left overs. There are blues, greens, cream and yellow with a few bits of rusty red-ish and beige. I'm no visual artist but I think it'll look good.
It's going to take a while to do, but it'll be worth the time and effort
Please excuse the cat, she was trying to help, and was insistent that she be in the picture.
Subscribe to:
Posts (Atom)